


Get ready for your Facebook past to come back with a vengeance; the social network is now rolling out its new profile layout, Timeline, to all users worldwide. Timeline is basically an online scrapbook that displays your Facebook activity in reverse chronological order going back to when you first joined the social network.
This means you and your Facebook friends will be able to peruse your social networking history with just a few clicks. Previously, there was no practical way to view your older activity on Facebook.
If Timeline's debut has you wondering whether you can hide the embarrassing bits of your Facebook life before your new profile goes live, the good news is you can. But you'll only have seven days to make any changes to your Timeline before it becomes your default profile.
Get Timeline
There are three ways Timeline could arrive on your profile. You can activate it now by visitingFacebook's Timeline page. You could also wait for Facebook to notify you that Timeline is available and then choose to activate it. Finally, for those who want to resist Timeline as long as possible, you can do nothing and Facebook will eventually move you over to the new look. In each case, you get a full seven days to edit your profile just the way you want it before it goes live. You can also choose to publish your Timeline at any time during the seven-day editing period.
I've been using Timeline since September and found it to be an interesting way to revisit all my past Facebook activity. Here's a quick checklist of five things you'll want to think about checking on your Timeline before your seven days are up.
Hide Old Posts
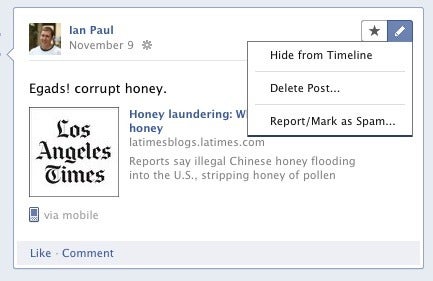 If you want to get rid of an old status update, photo, article link or like, go to the post on Timeline and hover over its top right corner. Click the pencil icon and select "Hide from Timeline." If you're hiding Facebook app activity, such as the Washington Post Reader app, the menu options to hide activity may be different.
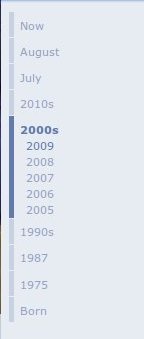 If you're having a hard time finding a particular post, look for a set of navigation links to the right that list your content by year. Click on the year you think your embarrassing post might have happened to find it. You can also drill down further by selecting a specific month.
Check The Log

If you want to keep a post on your Timeline, but don't want specific people to see it you can change an individual post's settings using your Activity Log. Click on "Activity Log" underneath your Timeline cover photo to see a single page listing of all your Facebook activity organized by date.
Some of your activity, such as when you write on a friend's wall, can't be restricted although you can delete these posts if you want. Posts that appear on your profile such as status updates and article links can be restricted. To start, click on the cog icon next to a post you want to restrict. A drop down menu will appear with controls similar to Facebook's new inline privacy controls. You can choose to make an old post public, only for friends, only you or a custom setting that excludes particular people.
You can also filter what type of data your activity log shows you. This could be helpful if you'd like to see a list of just your profile posts, or notes, or likes and so on. To do this, navigate to the top of the activity log and click on the "All" drop down menu on the far right of the main column and select your filter.

Feature Old Posts
If you have a post you'd like to feature, such as a photo of a wedding or graduation, hover over the top right corner of the post again. This time, instead of the pencil, click the star icon and the post will stretch out to fill the width of Timeline's main column.
Facebook automatically features some events and posts for you such as when you started work at specific job or graduated from college. If you'd prefer not to feature these posts, just click the star icon and they will shrink down to a regular size post.
Set Your Cover Photo
The top of your profile will now include a large photo called the cover photo that will be one of the first things people landing on your profile will see. You get to choose which photo you'd like to add there so take a few minutes to figure out what you'd like to put there. Keep in mind your cover photo is not private, so anyone on Facebook could potentially see it.
View As Public
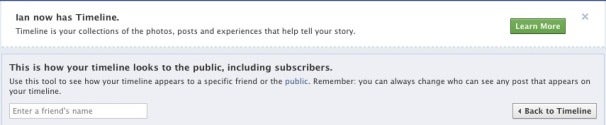
After you've edited your Timeline, you may want to check what others will be able to see on your revamped profile. To do this click on the cog icon underneath your cover photo and select "View As..." from the drop down menu. This will automatically show you how your profile looks to the public and your subscribers if you have any. You can also enter the name of any of your Facebook friends at the top of the page to see exactly what they'll see on your Timeline. Once you're finished, click the "Back to Timeline" button.
That's it. Your Timeline is ready for you and your friends to enjoy a trip down your digital memory lane.
Source http://www.pcworld.com


0 comments:
Post a Comment