Looking to lower your cellular bill? Here's how to use Google Voice and Groove IP to reduce your monthly costs--or even cut cell service altogether.
Smartphone plans are tricky when it comes to voice service. You can either go overboard and have a thousand or more extra minutes that you won’t use every month, or lowball your usage and count your minutes near the end of each billing cycle to make sure you don’t exceed the cap. However, if you set up Google Voice and Groove IP on your Android smartphone, you can reduce your voice usage significantly by routing calls through your smartphone's 3G or 4G connection--or, if you're willing to depend on Wi-Fi connections only, you could even ditch your cell service entirely. I'll show you how.
What Is Google Voice?
Google has offered Google Voice service since March 2009. It employs
Voice over IP, which is a communications protocol that routes multimedia
and voice communications over the Internet.
That means your voice goes
out over your Internet connection instead of over the standard voice
network. As a rule, your Internet connection will need to handle a bare
minimum of 80 kilobits per second both ways to get a good voice signal
and have low latency. Pretty much any cable, DSL, or mobile broadband
connection these days can handle that.
You can use Google Voice with any Android phone just by installing
the app, but in that arrangement it will still use your cellular
minutes. In order to receive the calls with your Wi-Fi or mobile
broadband connection, you need to use another app, Groove IP, to route
calls from a landline to your Google Voice number, which bypasses the
cellular network entirely.
Step 1: Set Up Google Voice
The first thing you have to do is sign up for Google Voice. If you already have a Google account, just head over to voice.google.com and continue on.
If you don’t have a Google account, you need to get one. Point your browser at www.gmail.com and click Create an account at the top right. Fill out the requested information, and click I want a new number
when you are prompted. Select the area code and then search for the
number you want. Once you choose a number, the service will ask you for a
PIN to use for verification purposes. From here, continue with the
instructions below.
Setting up a new Google Voice account from the Web page.
Next, click the gear at the top right of the Google Voice page and
look at the options. You’ll want to add your landline's phone number
(not your cell number!) by going to Settings, Phones and clicking Add a new phone. Google will call you to verify that the number is valid.
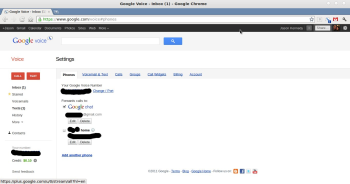
In the Google Voice settings, make sure to set 'Forwards calls' to Google Chat,
as shown below. That way, a call you don’t answer (if you’re offline,
for example) won’t ring through to your landline. Instead, you’ll
receive an email transcription of your voicemail message, as well as a
notification on your Android device that you have a new message.
You'll need to set Google Voice to forward calls to Google Chat.
Now that you've set up your Google Voice account, download Google Voice from the Android Market,
if your phone doesn’t have the app already. The initial setup is easy:
Log in, verify that you’re using the same forwarding number that you set
up on the Web, and then check Use Google Voice for all calls (press the menu button on your phone and go into Settings in Google Voice, and then into Making Calls).
You can also set Google Voice to handle all your voicemail. It's a
splendid service, but I'm not going to cover it here; read our basic Google Voice setup how-to article for specific instructions.
Having Google Voice running on your phone allows you to send text
messages from the Google Voice number you created; it also lets you
retrieve voicemail from the interface on your phone or on the website,
from anywhere. Calls made to your Google Voice number will forward to
your cell phone, and you get a host of settings and options for setting
up groups (family, work, and the like) for ringtones, do not disturb,
and other uses.
That’s all you need to do for Google Voice. Keep in mind that you may
run into situations where your Internet connection is not good enough
to make the call. In those cases, just turn off your Wi-Fi connection,
and Google Voice will ask if you’d like to make the call over your
cellular network instead.
Step 2: Set Up Groove IP
Google Voice is just one part of the puzzle--to ensure that calls to
your Google Voice number forward to your smartphone over your Wi-Fi or
mobile broadband connection, you need to set up Groove IP
($5) on your phone as well. Normally, if someone calls your Google
Voice number, that person will be forwarded directly to your voicemail,
since Google has no switching mechanism to connect to your device (this
procedure is called SIP, or Session Initialization Protocol). But Groove
IP makes the connection for you. In addition, it can handle your
incoming and outgoing calls in one place, as it has its own dialer and
uses your Google Address Book to make calls.
Once you have Groove IP installed, you'll need to tweak the audio settings a bit.
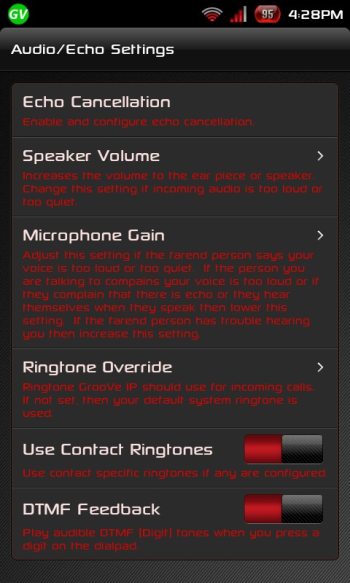
You’ll want to play around a bit with the settings, but if you go into Audio/Echo Settings, you’ll find several options that might need some tweaks.
- Echo Cancellation: Bear in mind that this setting can introduce latency, or a delay between when you talk and when the other party hears you (and vice versa). Mess with this setting last, when you're in an if-all-else-fails scenario.
- Speaker Volume: Though this may seem to be a general-use setting, try adjusting Speaker Volume if the party you are speaking with echos in your ear. A little goes a long way here, so make small changes and test them.
- Microphone Gain: By default this setting is pretty decent for normal usage. If the party you are speaking with mentions that your voice is loud or has an echo, turn down the gain. Again, make only minor changes and test the results if you need to.
Changing the settings above will require you to disconnect and
reconnect your call to test, so you might have to make multiple calls to
play around until you tweak things just right. It helps to have a
partner in crime willing to field multiple phone calls and report the
changes. I also advise against doing the “Can you hear me now?” shtick.
Remember that you’ll need to have Groove IP running at all times to
receive telephone calls to your Google Voice number, and that it will
drain your battery to some extent. Plan accordingly.
Whether you decide to use Google Voice as an add-on to your existing
voice service in a bad coverage area, or you elect to cut yourself free
of carrier captivity and go it alone with Google Voice and Groove IP,
good luck! Let us know how it works out in the comments.


0 comments:
Post a Comment